EDITOR’S NOTE – This guide contains spoilers in regards to Bloodborne’s story. If you haven’t beaten Rom, read at your own risk!
If you’re just joining us now be sure to check out our guides for Ludwig, The Living Failures and Lady Maria.
Well here we are again. We’ve been trampled on, speared, bumped and bruised more times than we can count. We have ‘DIED’ more times than we’re proud to admit but still, we battle on. Bloodborne is a demonic beast of a game. A cruel mistress who takes no prisoners. The Old Hunters DLC is even harder. After slaying three of the five bosses we are ready to tackle the fourth, Laurence. Join us won’t you?
Boss Weaknesses:
- Very similar fight to the Cleric Beast. Stay to his back and don’t get overly aggressive
- Bloodgems with +% damage to beast are your best friend
- Keep your distance in the second phase when you can.
- The Charred Hunter set helps immensely, especially with the Fading Lake rune equipped.
The clerics in the world of Bloodborne have tragic fates. They are the most staunch defenders of the beastly scourge that overtook Yharnam, however for that iron-fisted approach, they receive grotesque transformations, should they ever turn. Laurence is the first vicar of the Healing Church, and as such, was doomed to turn into a beast. He didn’t suffer as grotesque a form as Ludwig, but he did turn into a terrifying creature, nonetheless. Laurence turns into a fiery version of the cleric beast you encounter early in the game.
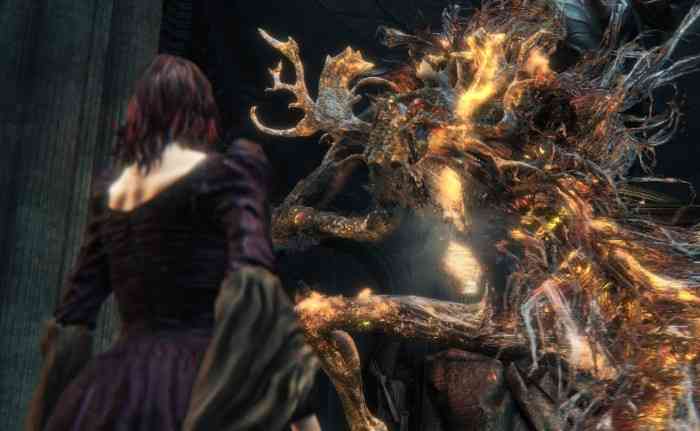
Laurence, The First Vicar
The final boss of this DLC is insanely hard. I’m still working on slaying them, however there’s one other creature we can purge from The Hunter’s Nightmare, and that is Laurence. This fight is VERY similar to the battle with the Cleric Beast, but the fight has a few twists to make this a fun fight, despite it being what boils down to a palette swap, should you be cynical enough. Laurence’s move-set is largely the same as the Cleric Beast, however he has his amplified by his fiery rage, and as such, AoE damage is much more likely to occur. Like my past guides, the same rule is in place: Don’t stay in front of these bosses. Laurence hits incredibly hard, and 30+ VIT is definitely recommended, although not obviously necessary. If you’re familiar with the Cleric Beast’s moves, you’ll have a good idea of how to handle yourself.
Obviously, fire is not the way to go. In this case, any of the trick weapons that deal amplified damage to beasts are highly recommended, alongside the according blood-gems. You can almost double your damage you’ll deal to beasts, and it is a huge boon in this boss fight. If you’re unsure of what weapons have this quality (Many have descriptions that should make it somewhat clear, but this is From Software, after all.), you can find them here (huge shout-out to the wiki for this information.) As you whittle away at Laurence’s attacks, he’ll soon increase in aggression, much like the Cleric Beast. The big attacks to watch out for in this case are when he lifts his left arm. This tell indicates he’ll use one of the two new attacks you didn’t see the Cleric Beast use, and use either a large 180 degree swiping attack, or a series of slashes in front of him. The same rules apply, and hugging his back is the way to go. You can also adapt a hit and run approach if you’d like. Physical damage seems to be the most effective here, but Bloodtinge builds are incredibly effective, and Simon’s Bow Blade (if you’re heavily geared for it specifically) does impressive damage and lets you kite him quite easily. There’s many ways you can go about the fight, and as he nears his demise, Laurence’s fight takes an almost pitiful turn.
______________________________
“Provided you avoid his tells with his left arm and stay away from his front, you should be able to conquer this fight without much challenge.”
In his final phase, Laurence’s legs break, and he begins to crawl around, still attempting to spew lava and claw at you. This is a huge shift down from his aggressive second phase, and so long as you don’t get greedy, you’ll be ok. The biggest thing to watch out for in this phase is the lava leaking out of Laurence’s wounds. You can use a lead elixir to help prevent getting stunlocked, but it does slow you down, so it may not be worth the risk. It’s merely worth consideration should you find yourself getting killed by it more than you are by Laurence’s attacks.

This guide isn’t necessarily as in-depth, but that’s partially due to the nature of Laurence’s fight. Provided you avoid his tells with his left arm and stay away from his front, you should be able to conquer this fight without much challenge. I actually also recommend not summoning for this one, as AI/other player hunters make him extremely unpredictable. With how hard Laurence hits, this should really only be if you want to add some challenge to the fight. Once you slay him however, you gain access to one of the coolest runes in the game, the Beast’s Embrace. Equipping it allows you to finally harness that sought after “beast-form” that people theorized over madly when the game first came out, and if you have yourself a set of beast claws, you gain access to some really fun abilities to use with those weapons, such as an improved version of beast roar and a leaping attack with a fairly high amount of tracking.
Now, pray for me, as I return to The Fishing Hamlet to conquer the final boss of the DLC. We’re in for a doozy as we’re about to tangle with what is probably the hardest boss in the entire game.