Over the past few weeks I have had some in-depth time with AVerMedia’s Game Capture HD II, the follow up to the original Game Capture HD. The unit has been in my possession for awhile now, but I won’t lie, it’s been a busy time with the holiday season glut of games and other personal responsibilities, but alas I have finally had the time to sit and play with this recording unit long enough that my impressions can be summed up for your viewing pleasure.
Recording videogaming footage has always been a mixed bag. The traditional methods in the past have usually required capture cards in computers where one was required to hook up their gaming console to the card for recording purposes. Over the past couple of years though some companies have made “portable” methods for people to record gameplay from videogame consoles, and AVerMedia is one such company. Their most widely known unit in this realm is the Game Capture HD, which garnered some pretty positive reviews as it was easy to use and quite convenient. The Game Capture HD II improves on many of the features of the original and makes the product more convenient for the average videogamer who may want to show off their gaming skills.
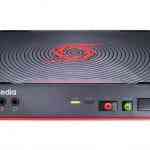
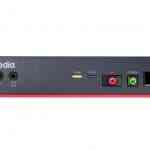
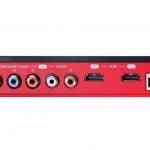
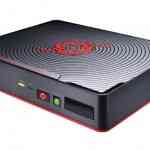
When I opened the box I was surprised with how well this product looked and what was contained in the box. Given that AVerMedia is truly trying to make the world of videogame recording more simpllified for everyone, everything you need in the box is mostly there. You’ll find the Game Capture HD II itself, a power cable, remote control, and even an HDMI cable. There is a quick reference guide as well as a fairly detailed user manual. You can see from the pics included how the unit looks and I think it looks pretty sharp. Something you can’t see is the bottom of the Game Capture HDII. Here you’ll find a door that opens up. This is where the SATA port is hidden as you can attach a 2.5″ HDD in either 9.5mm or 7mm height. I installed a 500GB HDD in this bay but you can use an external HDD or USB stick via the USB plug on the front should you want.

Set-up of the Game Capture HD II is done on your TV/Monitor and includes such things as the quality you want to record in, allowing the unit to pass any signal through when powered down, security features, and anything else that may be required for you to use the Game Capture HD II. My first impressions when powering up the HD II were somewhat mixed. When I first connected everything to my family room TV to record some Wii U footage it wouldn’t let me go any further then just powering up as I did not have an internet connection (LAN Plug) hooked up. It told me it wanted to go through the set up process including checking for any updated firmware on the internet. So without any further investigating I unplugged everything and went into my media room where I do all my gaming and where I have access to router and a hardwired connection. A wireless feature may have been beneficial here, but hey, maybe this will happen in the HD III version.
After hooking everything up, recording is as simple as finding out what you want to record while playing any game and hitting the record button on the remote or the button on the unit itself. The red record light will flash as you are recording and once you are done you need only hit the record button again to stop. There is also a button that allows instant review of your recorded content if need be. I found I didn’t this button as I continued playing until I was done a level or waited until I wanted to review the footage.
One of the key features that the Game Capture HD II offers is basic editing of the videos that you record. This feature is really aimed for those who are not video editors or just want the simplest of editing tools. I edited a video or two using the included remote control, and although it is useful, I did find it somewhat slow and clunky to use. That being said, it is a neat feature for sure. It’s as simple as finding the video you want to edit, mark sections of the video you want to keep and those you want to delete and once you have edited it to your liking you simply hit “export” to create the newly edited video. Now this method of editing does have its limitations. You can only edit the video that is stored on your device (external or internal HDD). You should also be forewarned that in regards to you can only get down to seconds when fine tuning footage, so, it’s not as “accurate” as when editing a video on a computer where editing software can get down to a hundredth of a second. Regardless, the editing tool is somewhat useful for the general YouTuber. The video I edited the most (Skylanders SWAP Force) allowed me to take out such things as the loading screens, my surfing through various menus, and other boring stuff while being able to keep what I wanted people to see.

Another key feature of the Game Capture HD II is that users can upload to YouTube directly from the box itself; this is why there is a LAN connection on the back. By simply connecting to a router or modem and inputting in your YouTube channel name, password, and what setting you want (e.g. private, public, etc) you can simply press a button and upload your video for everyone to see. Simplicity is what AVerMedia was going for here, and alas it is a simple process. You also have the ability to include a basic watermark on your video, something I didn’t do until after the first video I recorded. So you’ll see the AVerMedia watermark on one video, but you’ll see a Game Canadian watermark on the other three. These watermarks are basic looking, but at least it gives people the ability to put something rather than nothing on their video to make it their own.
I have included four videos in this review that I recorded with the Game Capture HD II. The first was done in 720p (the NATIVE resolution of the Xbox 360). I then recorded the Wii U version of Skylanders SWAP Force in 1080p and I then recorded two sessions of COD: Ghosts on the Xbox 360 in 1080p resolution. Some of the videos were edited on the Game Capture HD II and all of them were uploaded to YouTube directly from the Game Capture HD II and the 500GB HDD that I installed.
Two final key features of the Game Capture HD II are the ability to record voice during the recording of your video and the ability to use an app called GameMate. In regards to the voice recording feature, I did not include any of the video I recorded when using a microphone to record voice commentary. The reason for this is that I did the majority of my recording of video with the Game Capture HD II in my media room, where I sit about 12-14 feet back from my screen. The one video I did record with commentary is not representative of the feature as I sounded distant as I was so far away from the microphone. I have seen videos online of the commentary that you can do if using a microphone right by you and it sounds fairly good. As for the GameMate app, I use a Windows Phone and Surface table, and the app is made for iOS and Android devices. I can tell you that GameMate basically acts as a second monitor so to speak and it allows you to monitor the time left on your HDD, as well as recording status. It also allows your iOS or Android based device to act as another remote to take screenshots, activate the record mode, and pause it. In theory it sounds pretty useful; however me, my Windows Phone and Surface were left out of the cold.
If I have any gripe with the Game Capture HD II is that there is NO way to transfer your video from the unit itself if you have installed a HDD. The only way to transfer any files to a computer for external editing and adding of intro/credit screens, custom logo watermarks, or splicing of mutliple recording sessions, is by using an external HDD or USB stick. It’s my hope that they allow this to happen in the HD III version next year. The Game Capture HD II also only records in a max of 1080p30fps, so any higher frame rate is somewhat lost in recording.
One final note, the Game Capture HD II is also compatible with the PS4 and Xbox One. Sony has said they will support external recording in a future firmware update on the PS4 while all indications is that the Xbox One will support this feature at launch. And although both of these machines have touted their own ability to record gameplay, they are not uploadable to YouTube at this time and AVerMedia has confirmed that you can indeed do this with the Game Capture HD II.
In the end I found that the AVerMedia’s Game Capture HD II is really geared for that “Average Joe” who loves to videogame and wants to show the world what games they are enjoying. The ability for some really basic editing, added voice commentary, and the personalization of adding a simple watermark right from the box is pretty cool. Of course being able to upload your finished video straight to YouTube is a pretty convenient option too, should you have an LAN cable available to hook up to the internet. Sure, there are better ways to get a more professional looking video completed, but I have a strange feeling that the Game Capture HD II is not geared for those type of people. With this in mind I think that the Game Capture HD II is something that all those people interested in recording gameplay videos and posting them for the world to see should take a close look at as the simplicity it offers to do this in a very portable package is pretty fairly impressive.
For those wanting to see the other three videos I recorded, they are posted right below.