From the Lands Between to Rubicon 3
Are you one of the legions of gamers whose first FromSoftware game was Elden Ring? Maybe you also ventured into Lordran or found respite in Dark Souls II’s Mejula. And now, you’ve heard about Armored Core VI Fires of Rubicon and you wonder, how does it compare to Elden Ring, Dark Souls, or Bloodborne? How different from Dark Souls is this new entry in a very long-running series of games? Do my hard-earned skills transfer?
Well, the good news is that if you’ve persevered through any FromSoftware game, you’ve learned an important lesson: failure is a teacher. Hitting a wall is part of the process. It’s a feature, not a bug. You try, fail, adapt or change, and try again. More than any other FromSoft game, this is the foundation of Armored Core VI.
And, as we’ll see, some things carry over in very different forms. You still have healing items. Stamina, HP, and your equipment burden still need to be managed, and there are ranged and melee weapons. Things aren’t that different. Well, they sort of are, too.
The other happy news is that dying exacts a far less severe penalty. Whatever COAM (i.e. currency) you acquire in combat or exploration isn’t snatched away when you die and you don’t need to make a desperate trek to retrieve souls or runes. You can restart from the beginning of a mission or a checkpoint. But death isn’t entirely meaningless. Depending on when, how, and if you use healing items, that checkpoint restart will extract a toll on your cash each time.
TIP 1: It’s the Legs, Man
In Armored Core VI, the kinds of legs you equip on your mech make a huge difference. It’s no exaggeration that the legs are perhaps the single most important component. There’s nothing in Elden Ring or Souls that’s quite the same.
By the end of Chapter 1, you’ll have access to buying all the standard leg types: bipedal legs, tetrapod, and tank. Multiple variations and more powerful versions will come, but your task early on is to acquire all three types, plus the all-important reverse-jointed bipedal legs.
Bipedal legs are the basic, all-around useful form and will serve you well in most situations. The reverse jointed version is extra-useful for achieving higher jumps and staying mobile in the air. The tetrapod legs allow you to hover for extended periods and rain death from above or avoid ground-based attacks. The tank legs aren’t great for becoming airborne but they’re extra defensive.
You will find enemies and levels where one type of legs or another is literally the key to avoiding protracted frustration. FromSoftware contends that you can play the entire game with one Assembly. I sure wouldn’t want to try.
Tip 2: Change Your Assembly. Often.

Armored Core VI is built on the mechanic of constantly reconfiguring your mech. Unlike Elden Ring or Dark Souls, you don’t need a hard-to-find trinket or go on a death-defying trek or re-spec your character. There’s not even a cash penalty because you buy and sell items from the shop at the same price. Don’t like it? Sell it. No harm, no foul, no loss.
Not being invested in a specific build is not just convenient, it allows for experimentation, creativity, and fun. Not to mention, of course, actually getting through the game.
In Armored Core, there’s no XP to throw at upgrading your character. Your increasing power in large part comes from the weapons and mech components you find, earn in combat, and equip. A secondary system called OS Tuning allows you to add upgradable passive abilities or special moves like a powerful kick. You earn OS Chips from combat in the Arena.
Like your legs, the rest of your Assembly (that’s AC speak for your build) is a key that unlocks success against specific enemy types. Is a mech’s energy cannon kicking your ass? Try using a rifle that disrupts it. You’ll never find yourself being a glass cannon mage in a room full of damage dealers. You can always change!
Tip 3: Play the tutorials!
This one’s short and to the point. Nestled in the first chapter’s Sortie (i.e. missions) menu is a series of tutorials. They place you on a battlefield, explain specific mechanics, and allow you to master them.
Even if you’re an AC veteran, though, these seemingly basic and skippable missions are NOT something to skip. For one thing, they introduce you to some basic enemy types and their tactics. Good stuff to know.
More importantly, completing the tutorials actually gives you new weapons and mech components. The final chapter one tutorial mission is how you unlock the Arena and OS Tuning, both vital elements of the game.
Tip 4: No Help Is Coming
Players of Dark Souls, Bloodborne, and Elden Ring are used to calling on jolly cooperators when they get in a bind. But in Armored Core VI, there are no ghostly skellies, magic-spewing jellyfish, or noble knights. You can fight other humans in the Arena, but you can’t count on their help.
There are a few missions where you squad up with AI characters, but don’t expect them to carry the fight or do much more than distract the boss.
Despite the constant chatter from Walter and Allmind, you’re on your own. Accept it. Take comfort in the knowledge that when you succeed, it’s only your own back you have to pat.
Tip 5: Margit vs Juggernaut
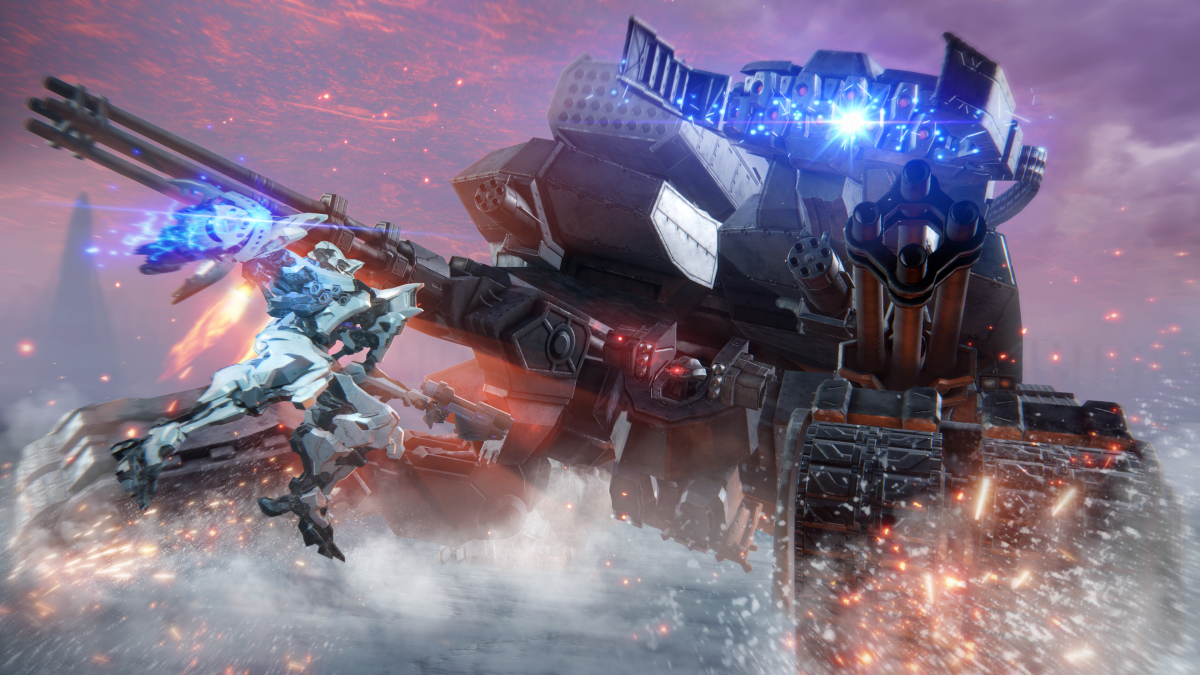
Because it is an open-world game where you can tackle the bosses in any order, not every player faced off against Margit, The Fell Omen as their first boss. But of course, that was where the game subtly led you. In Armored Core VI, the mission structure dictates that Juggernaut will be the initial boss for all players.
For many, Margit was a frustrating first boss. The arena was very small and precariously perched on a cliff. Margit hit like a truck and had both physical and magic-based attacks. And often, players rushed to Margit before they were properly leveled and ready.
Breathe a sigh, because while Juggernaut isn’t a cakewalk, it might be an easier first boss than Margit. For one thing, the game has given you lots of tools, weapons, and components to play with. It has pitted you against a wide range of enemy types. In other words, it doesn’t let you at Juggernaut until it thinks you’re ready.
This is not a boss guide, but suffice it to say that while Juggernaut has a lot of weaponry and a rolling attack that can end your fun pretty quickly, it has a very significant weak point (anything behind its forward-facing shield), and best of all, it remains on the ground while you can fly above and around it. You have an ally mech for half the fight, so all you need to do is finish it off. You know, when it’s good and mad. In this regard, it’s a little like Margot and the NPC summons, who almost always died before the fight was over.
For Juggernaut, three tools might make the fight a little easier. Those reverse-jointed legs will come in handy. The bazooka in your right hand and the vertical missile launcher will stun the Juggernaut, and then you can swoop in with your left-hand blade and do some serious and very satisfying damage.
Thank you for keeping it locked on COGconnected.